
Amazon is an online marketplace used by millions of people globally. From clothing to electronics to toiletries, you can find almost anything on Amazon.Wondering how you can get in on the action and how to sell on Amazon? All you need is a small monetary investment to get started and the knowledge of how to run a successful listing.
Anyone can sell on Amazon if they can choose a product, set up a profile and find a fulfillment provider. The benefits of selling on Amazon range from access to millions of customers to the ease of their platform.
Here we’ll walk you through each step of the selling process from setting up your account to expanding globally. Learn how to sell on Amazon.
Chapter 1: What to Expect When Selling on Amazon
When preparing for how to sell on Amazon there is a four-step selling process. First you list your product, then you sell it, ship it and get paid.
Each of these steps will include many sub-steps but at its core it’s really quite simple. Though there is a learning curve, once you understand the process, selling on Amazon can be easy and fun.
Choose a Product
Finding a profitable product is essential to a successful Amazon business. If you own a small retail business you most likely already have a product or several products in mind.
If you are starting from scratch you will need to pick something to sell. Here are some tips for choosing a product:
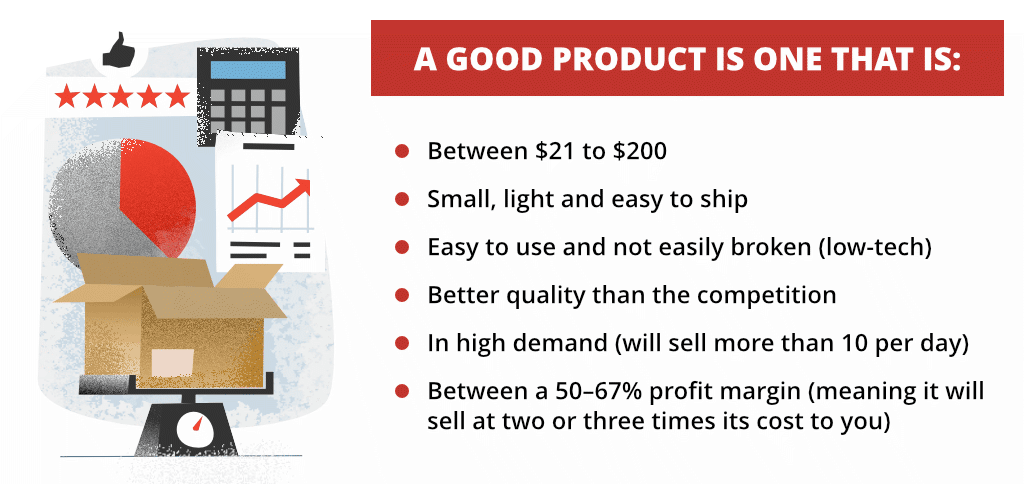
You can look at the ads on Amazon to get a good idea of what’s selling well. Simply type in a category you’re interested in and see what people are promoting through ads. These sellers are likely promoting the product because it’s selling well.
You can also use tools like the MerchantWord’s keyword researcher to find items that are being searched for frequently online.
Other tools like Datahawk, CamelCamelCamel and ASINspector and Sellics can allow you to easily research keywords, calculate ROI, unveil attractive niches and increase your SEO.
Remember to keep your items within your department. Try to pick something that will have complementary items so that when you start to bulk up your store your items will be related in some way.
For example, if you sell pillows, other products that will naturally follow suit are pillowcases, sheets and other bedroom products.
Find a Supplier
Small businesses who already have a product don’t need to worry about this step, but for those just starting out this step is crucial.
Once you’ve chosen your product, you’ll need to find a supplier. You can start by searching on Google for a U.S. supplier or someone who sells your product wholesale.
Non-U.S. Based Suppliers
Alibaba is a great resource for finding a wholesaler that is overseas. While it may seem intimidating, there are are best practices you can follow to ensure a safe transaction on Alibaba.
Always ensure that they have “Trade Assurance,” are a “Gold Supplier” and are an “Assessed Supplier;” you can check these boxes when conducting a search to filter suppliers in the results.
Calculating Revenue
Always check the purchase price of the item you want to sell in the Amazon Revenue Calculator to see how much profit you will make after Amazon assesses their fees.
You may need to negotiate with a supplier to get the costs down and set a competitive price. Ecomcrew has a great guide for contracting and negotiating with Alibaba suppliers.
What is Minimum Order Quantity
Some suppliers have a Minimum Order Quantity (MOQ) and will not accept orders below a certain number. Determine if you can meet your suppliers MOQ or try to negotiate them down.
Calculate Your Profit
After you’ve chosen your product you will want to calculate the return on investment (ROI) you are standing to earn. This will help you determine costs and keep track of how much you expect to earn.
Download the Amazon Seller App
You can calculate the profit you will make on an item whether you’ve set up your account or not.
For those already set up as a seller, the Amazon Seller App (for Apple or Android) will allow you to see the selling price and fees associated with any product on their website.
The app allows you to use the camera on your cell phone to scan a product’s barcode, and will show you the pricing and fee information for the scanned product.
This is a popular app used by those who participate in “retail arbitrage”, which you can learn more about here.
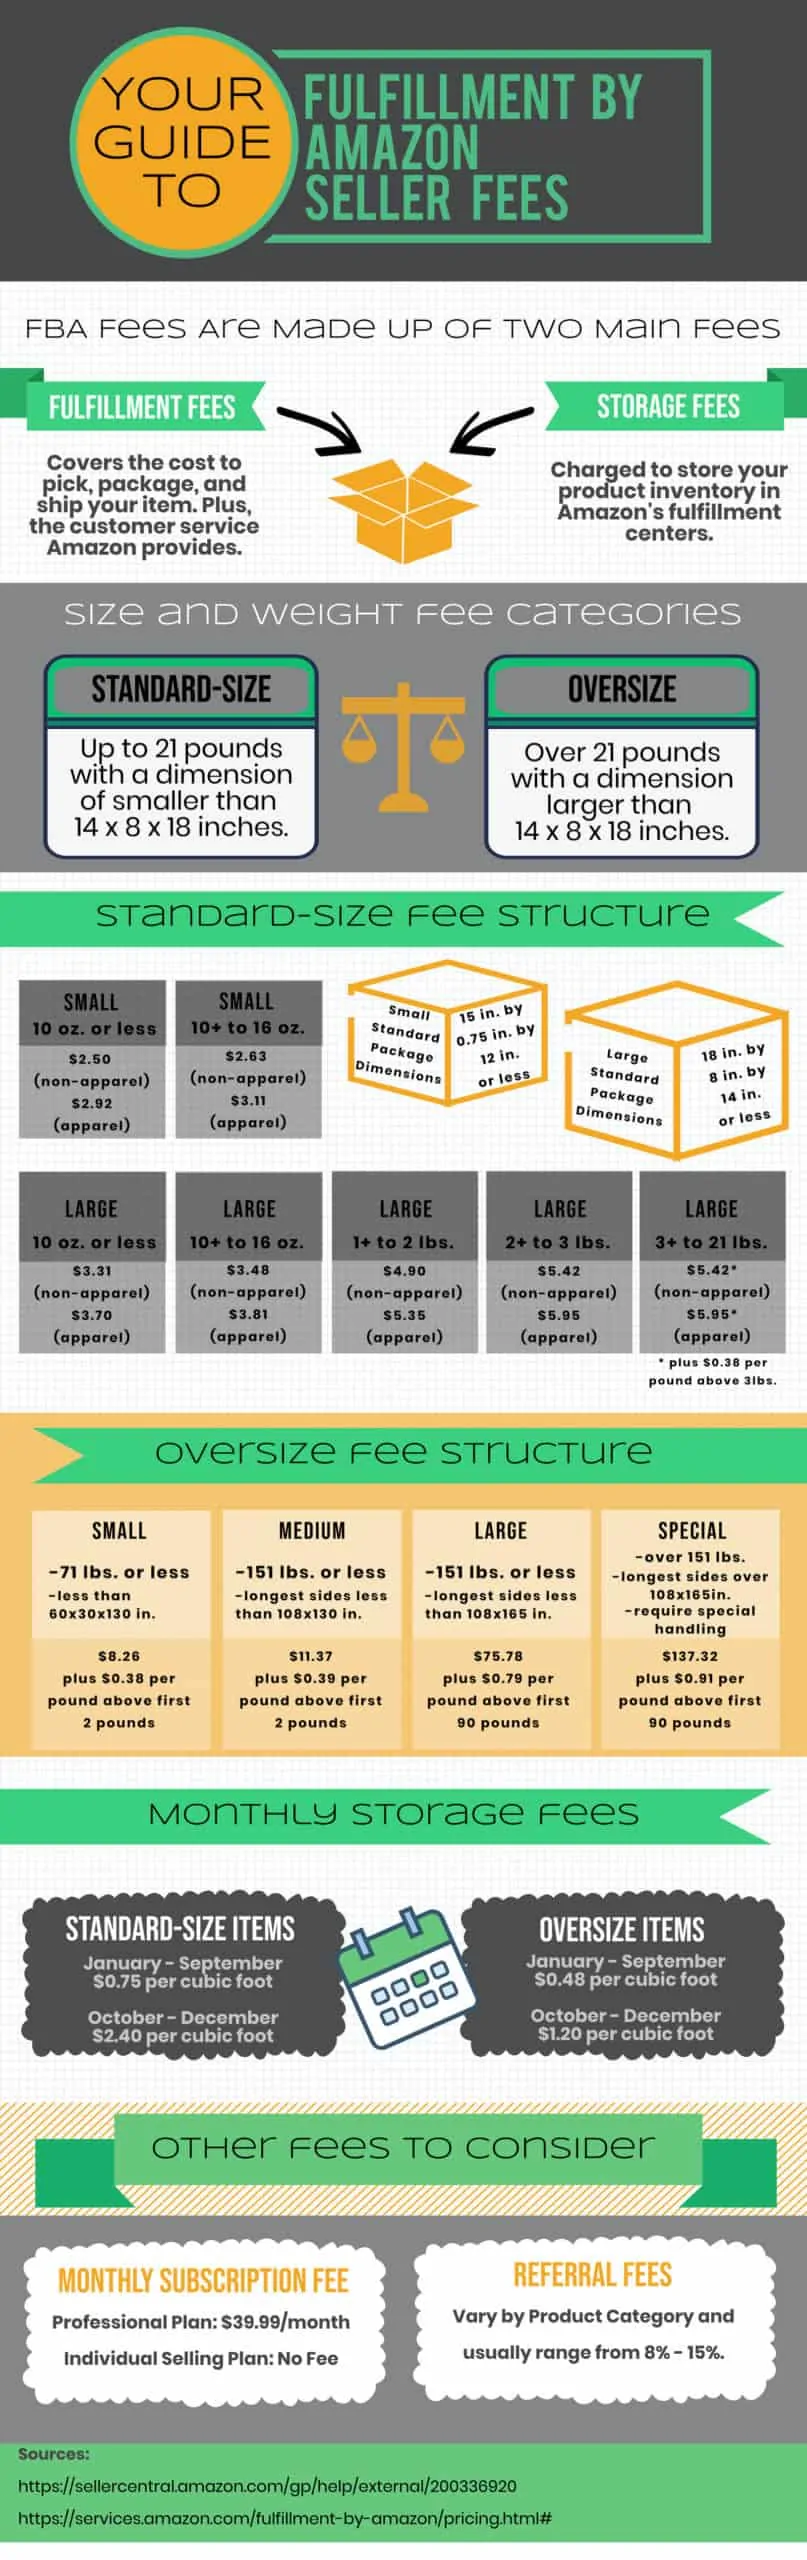
Use the Fulfillment by Amazon (FBA) Revenue Calculator
If you have not set up a seller account yet you can use the FBA Revenue Calculator to get the fee details on any item.
Simply search for the item that you are considering selling on Amazon and enter the price, how much it will cost you to ship to Amazon, and how much the product costs you. At the bottom it will display how much you should expect to receive as profit.
Compare Shipping Costs
It can also be a smart choice to use a fulfillment company to ship your product, and the costs might even be lower than FBA.
You can get in touch with your fulfillment company and discuss their ecommerce fulfillment rates to get an idea what you will be earning in profit.
Obtain Supplies
There are several preliminary steps you’ll need to take to ensure a smooth process down the road.
Order a Small Test Sample
Ordering a small sample of 10–20 items before making a bulk order will allow you to not only test the product quality but test the bulk seller’s reliability.
You can also sell this small amount on Amazon as a “test run” to get a feel for just how in demand it is. For example, if it sells out within a day or two, it’s high demand.
If you already have a business that sells a specific product you can skip this step.
Order UPC Codes
Amazon requires you to have UPC code, or barcode, to list a product on their platform. Since you will likely be purchasing from a supplier without this UPC code, you will need to purchase it from a third party like BarCodes Talk.
UPC codes help the fulfillment company keep track of orders and prevent mistakes. You will only need one UPC code for each product you plan to sell.
Photograph Products
Product photography is not necessarily as complicated as it sounds. These days, some cell phones can even produce a good product photo if done correctly.
With a few tips and best practices you can create professional looking photos on a low budget. All you need is a backdrop, good lighting and a decent camera.
You will want your photos to stand out to compete with other sellers of the same or similar products.
Therefore you will want a crisp (1000×1000 pixels), well-lit image that accurately represents your product and displays its uses and features. You can also pay a professional to take your product pictures for you.
Create a Logo and Branding for Amazon
Having a professional looking brand image for your product on Amazon is key to how to sell and will help you stand out in a sea of sellers.
Hire a freelance graphic designer from a website like Upwork, Fiverr or Freeeup and explain the aesthetic you are going for. Many times they should be able to create a logo for you within a couple of days and many cost less than $50.
Another perk of using a freelancer is that moving forward you will have someone on call to make any product inserts, packaging design or promotional materials.
Set up Your Bank Account
Amazon will pay you bi-weekly. The Statement View in your Payments Report shows you when and how much you will get paid.
You can find this information in your Amazon Seller dashboard (more on this later). The information is updated automatically so that it always shows up on the payment report.
Transfers to your bank can take up to three to five business days to complete.
If you are seller fulfilled vs. FBA they will hold onto your money for a while longer in case of returns. Keeping your account in good standing and up to date is the best way to avoid delays in payment.
Chapter 2: Getting Set Up
Now that you’ve taken the preliminary steps to setting up your business you will want to set up your Amazon Seller account. You may also want to consider using Amazon AWS (Amazon Web Services).
Choose a Seller Category
Choose a seller category based on the size of your business. Each option will make sense for different scales.
Sell as an Individual
Selling as an individual is a smart option if you are a first time seller or plan to ship less than 40 items in a month. Amazon charges $1 for every item sold so when shipping a small number of products you can save in the beginning.
Sell as a Professional
Selling as a professional costs $40 a month. If you’re planning on selling more than 40 items, this is the most cost-effective choice.
Create Your Amazon Seller Account
You have three options for making an Amazon account.
- Visit services.amazon.com and click on either “Selling on Amazon” link or the “Sell on Amazon” box
- Visit sellercentral.amazon.com and click on “Selling on Amazon” in the bottom left hand corner
- Click on the “Sell” button at the top of the amazon.com homepage
Set Up Your Profile
The registration process can be completed in under an hour. It is relatively self explanatory but there is information you will want to have handy before starting.
- Legal business name, address and contact information
- Email address that’s dedicated as the company account (should be set up before starting the process)
- Internationally chargeable credit card with a valid billing address
- A phone number where you can be reached during the registration process
- Tax ID information such as your Social Security number or your company’s Federal Tax ID number. You can learn how to do that here.
Set Up Your Seller Settings
Once you are registered you will want to ensure you have the right settings enabled. In the top right corner of the Seller Central home page, click on “Settings” which will generate a drop-down list.
Your login settings are here, as well as several other setting you will want to configure.
Account Info
Verify that all of your contact information is correct. Here you can also enter a display name if you choose not to use your legal name.
You can also double check your return information to make sure that the information is correct regarding how you would like returns handled.
Notification Preferences
Choose which emails you’d like to receive and which you would rather not. These will include emails like reports, product recommendations and news or changes to your listing.
You will want to make sure the “Listing Notifications” and the “Report Notifications” are turned on as they are critical.
Shipping Settings
As a Professional Seller you will be able to choose your own shipping rates if you are fulfilling yourself. If you’re working with a third-party fulfillment company you will need to adhere to their pricing structure and shipping times.
Keep in mind that the faster and cheaper things ship the more likely customers are to choose your product.
Tax Settings
Talk to your tax professional about the required taxes for your business as it varies by state. You will need to provide your state tax ID information here.
Amazon can collect your state tax for you, but it is your responsibility to pay your state taxes. You will need to find out the procedure for each state in which you will be paying state tax. TaxJar is a great tool for helping you determine this.
Personal Information
You can fill out your “About Seller” information here which is helpful for customers who aren’t familiar with your company. Just provide an overview of what your company sells.
You can look at other people’s “About Seller” sections for inspiration. You can also upload your company logo here.
Chapter 3: Listing Your Product
After you’re finished setting up your profile Amazon will begin prompting you to begin selling your products. The Amazon sales channel lets you create and manage listings to sell your products on Amazon.
When you’re ready to begin listing items visit the inventory tab of Seller Central and click “Add an Item.” From here you can create a new product or search Amazon’s catalog for already-entered product information.
Be Aware of Category Restrictions
Before you begin listing your products you should ensure that you’re not selling in one of the restricted categories.
There are several categories of products that require special approval. You can view a list of them on Amazon’s website. It’s best to avoid these when you’re just getting started.
List Products Not Yet on Amazon
For unique products that aren’t in the system yet you will need to use the “Create a New Product” tool. This page requires more information than if it were already in Amazon’s catalog to ensure a complete listing for buyers.
You will need to fill in the manufacturer, product name and its FNSKU number. The FNSKU number is Amazon’s internal UPC code and will need to be generated. These will be used to track the item and avoid mistakes.
List in Bulk or Individually
Listing products individually is recommended when you are first starting out because it gives buyers a better sense of the information behind each product.
If you have many similar products (like clothing) to sell you will need to follow the Amazon template for that kind of product. You can get a detailed example of how to do this here.
Chapter 4: How to Sell Your Product
Once your listings are live on Amazon you can begin to optimize your listing and experiment with the features.
Winning the Buy Box (and How You Can Lose)
The buy box is the white box on the right side of the Amazon product detail page where customers can add items for purchase into their cart.
Since there is no limit to the number of sellers who can sell the same item there is competition for which seller will win the Buy Box and not all sellers are eligible.
Only businesses with excellent seller metrics have a chance at scoring this valuable real estate. Understanding Amazon’s algorithms will increase your chances of winning the buy box.
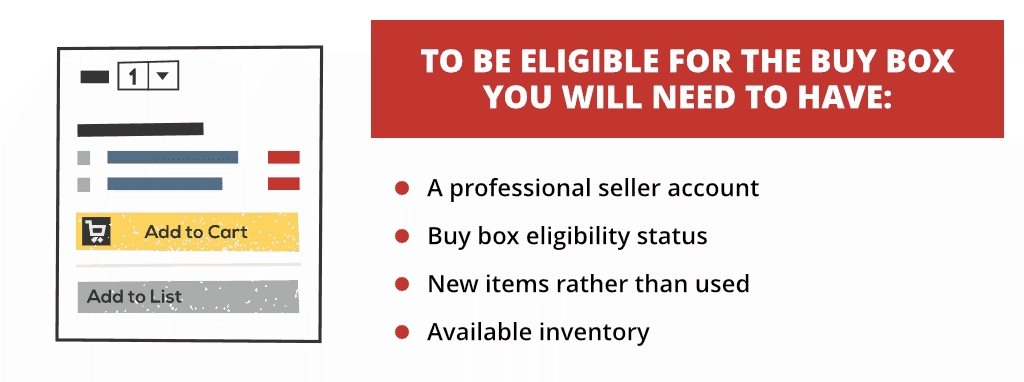
To be eligible for the buy box you will need to have a professional seller account, buy box eligibility status, new items rather than used and available inventory.
Amazon will choose which seller’s item goes in the buy box by weighing low prices and seller metrics to try to give customers the “best deal.”
If you have great performance metrics you can afford to price your product higher. If you have mid-range metrics you will need to offer a more competitive price.
After eligibility the buy box’s algorithm looks for four main things:
- Using FBA: Amazon favors its own fulfillment options.
- Seller-Fulfilled Prime: This offers top-performing merchants the opportunity to enjoy the benefits of Amazon Prime while using their own chosen fulfillment company. You must have very strong metrics to apply.
- Landed Price: This is the total price the product goes for, including shipping. The more competitive the price the more likely it is to end up in the buy box.
- Shipping Time: The time it will take for the seller to receive the product is important. Amazon favors short shipping times.
Your product can also land on the “Other Sellers” section below the buy box. These listings must meet all the buy box criteria, and while they are not as visible as buy box it still increases visibility.
Advertising on Amazon
You can choose to advertise your product if you want to gain more visibility for your product. Amazon allows sellers to pay for specific keywords so that their product will appear when a shopper searches for those keywords.
Amazon ads can appear at the top of the search results and they can also appear on the product page itself under the buy box or at the bottom of the page.
The average Amazon ad costs (ACOS) around $0.35 per click making it more cost-effective than using AdWords or Bing Ads. Given the commercial intent of Amazon’s viewership this can be very profitable.
You can choose between self-serve ads or premium ads. They both have their advantages and drawbacks. Wordstream.com has a comprehensive guide detailing the differences in ads and how to set them up.
Amazon Associates allows you to advertise your products by allowing affiliates to create links to the products in exchange for a small commission fee.
It’s free to join and easy to use. This allows you to reach audiences you might not have previously and increase sales.
Optimizing Your Listing
Optimizing your Amazon listing is an extensive topic and the internet is full of advice and tips. Here are some of the most important aspects to optimize on your product listing.
Product Title
You get 500 characters to title your product on Amazon. The longer and more detailed your product title the better.
Focus more on keywords and less on having a compelling, attention grabbing title. Titles that are long and keyword rich perform best.
Content
You will often see bullet points describing a product under the title on Amazon. Utilize the bullet point section because detailed product features and benefits are known to increase conversion rates and increase search match for target keywords.
You can add a product description further down on the page, but the area that customers first see should contain bullet pointed, specific details and selling points about the product.
Make sure you utilize the character count allotment completely and avoid using duplicate content.
Categories
Be sure to choose the most accurate and narrowly defined category possible. Customers searching for products get directed to certain categories and if yours is inaccurate it is less likely to be noticed.
You will also be more likely to have a higher “best sellers rank” for your given category.
Reviews
Customer reviews are one of the most important ways to optimize your listing. Encourage your buyers to leave feedback and address any negative feedback immediately.
Well-worded and timely feedback requests can massively improve the amount and quality of your feedback.
Professional Quality Product Photos
Make sure your product images are crisp, clear and as professional looking as possible. Pictures should be 1000×1000 pixels and listings should include five or six images. Highlight the product’s look, features and different angles.
Chapter 5: Shipping Your Product
Depending on how hands-on you want to be and the budget you have available there are several options available for shipping.
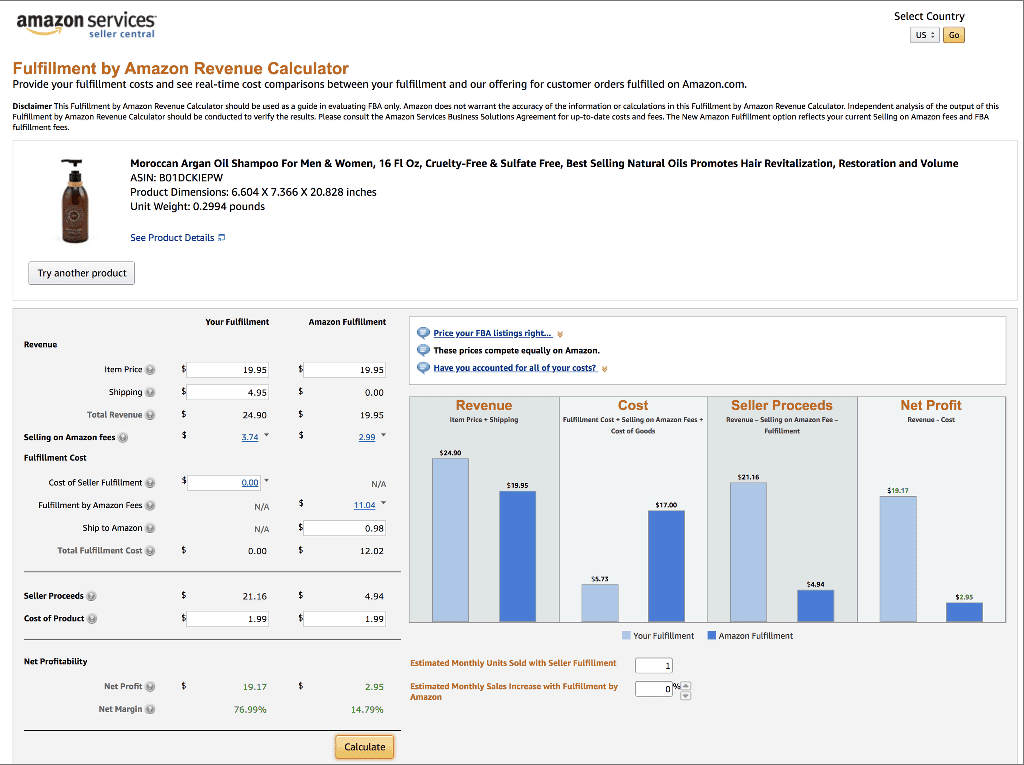
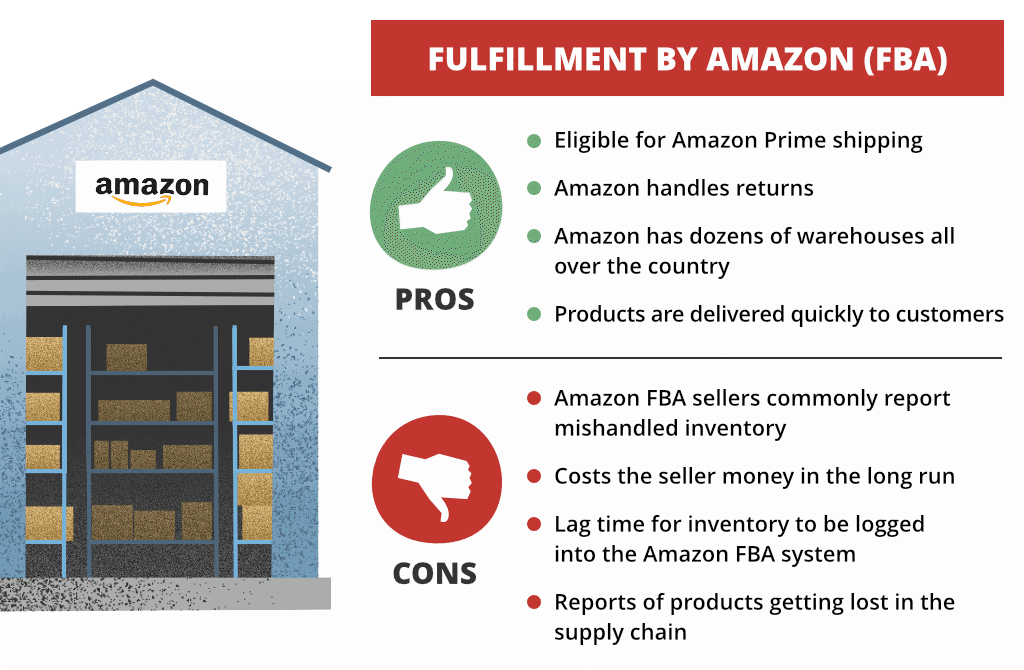
Fulfillment by Amazon (FBA)
Amazon’s built-in fulfillment company is a popular choice among Amazon sellers and there are pros and cons to using it.
Pros
FBA items are eligible for Amazon Prime shipping and Amazon handles your returns. Since Amazon has dozens of warehouses all over the country and world your products are delivered quickly to your customers.
Cons
Amazon FBA sellers commonly report mishandled inventory which ends up costing the seller money in the long run.
Sellers have reported a lag time for their inventory to be logged into the Amazon FBA system before it’s ready to ship and even reported products getting lost in the supply chain.
Additionally, in an effort to reclaim lost sales tax revenue the states have expanded their definition of “sales tax nexus.”
Using Amazon Prime can require you to pay sales tax in every state that Amazon has a warehouse (which is at least half of the states in the US). You will need to figure out where you are required to pay taxes and budget accordingly.
Seller Fulfilled
As the seller you are responsible for maintaining inventory, packing, labeling and shipping your items to buyers as needed. Shipping rates are determined based on the product category and shipping speed chosen by the buyer.
Once shipping is determined it is collected by Amazon, then paid out through the Amazon payment service to reimburse you for the cost.
This means that if your actual shipping cost is more expensive than the platform rate you will have to pay the difference.
Third-Party Fulfillment
You can choose to use a third-party fulfillment provider to outsource your shipping. It’s important to choose a fulfillment partner that meets the needs of your business. These include:
- Pricing Structure: Think about what kind of items you have and what it will take to ship them. Fees are usually adjusted by size and weight.
- International Options: If you want to ship internationally, you will want to make sure your fulfillment company offers that option.
- Warehouses: See what the costs are for storing your inventory, picking and packing your items. Consider the location of the warehouses in relation to where you will be shipping.
- Returns: A good fulfillment company should be able to easily manage returns.
- Customer Service: Some fulfillment companies provide built-in customer service, some don’t. If this is important to you you will want to make sure they include it.
- Customer Support: Ensure you have a contact who is ready to help you if there is an issue. Some companies offer higher levels of support than others.
- Integration: It’s best if the fulfillment company’s software integrates with your systems like your webstore, marketplaces like Amazon, ERP or accounting program.
Chapter 6: Tips for a Successful Selling Experience
Keeping your customers happy is an important part of running a successful e-commerce business. There are several small things you can do to ensure quick shipping and responses and avoid any issues that might lead to negative reviews. In case there are any issues with Amazon, there is always a possibility to sue Amazon in small claims court.
Check for New Orders Daily
Promptly satisfy all new orders by checking for them daily. You will receive an order notification when a sale is made but it’s best to check manually just in case. Orders can be viewed in the Seller Central portal as well as any customer communication.
Send Shipping Confirmation
Always communicate with your customer once an order has shipped. Amazon will not charge them until their order has shipped so this step is important for you to get paid.
You are responsible for confirming shipment. To do this go to the “Orders” tab and select the “Confirm Shipment” button for the associated order.
Check Your Inventory Regularly
Check your inventory levels regularly and replenish your stock early to avoid running out.
Keep in mind that shipping bulk product gets more expensive during the holidays, so get holiday inventory in early if at all possible.
Keep Pricing Information Up to Date
Since customers are most likely to choose the lowest priced product, it’s important to keep your pricing up to date and competitive. If you’re having a sale or can lower your prices a bit be sure to update your listing to reflect the new pricing.
There are tools available to dynamically price your product and maintain a competitive edge, increasing your chances of winning the buy box.
Respond to Customers Promptly
Good customer service is imperative to running a successful business.
Whether you’re doing this yourself, through Amazon or through a third party fulfillment service ensure that customer inquiries are being answered and their problems are being solved in a timely manner.
Amazon heavily weighs prompt response time when considering the status of a seller’s account health.
Build a Five-Star Feedback Rating
Cultivating a strong seller feedback process is one of the best ways to grow your customer base. A five-star rating will foster more trust in your product as well as get you better placement on Amazon and a chance at the buyer box.
Be sure you describe products accurately, ship your product promptly and provide great customer service.
If you do all these things well, don’t be afraid to ask for reviews. This can be done in the form of an email after shipping or a paper request included in the package itself.
Aim to Keep Returns Below 8%
Minimize returns by ensuring your product is accurately described, arrives in excellent condition and is sized correctly.
For example if you’re shipping clothes make sure the size chart is accurate to avoid excessive returns. If your returns rise above 8% Amazon will shut down the listing.
Chapter 7: Using Amazon to Expand Your Business Globally
If your business is successful you will want to expand globally. It’s important to make sure that everything is in place with your shipping provider and that you understand all of the taxes and fees associated with expanding globally.
To expand globally you’ll need to set goals based on your product categories and business strategy.
There are two options to choose from when shipping internationally: FBA Export and the Amazon Global Setting.
FBA Export (Pros and Cons)
This is an Amazon program that allows you to sell your products internationally either on your own website or through Amazon.
To do this, ship your products to Amazon fulfillment centers and Amazon will take care of the packing, international shipping, returns and all customer service issues.
When you do this your products are listed as “export eligible” on your listing. There are pros and cons associated with this method.
Pros
You can easily reach international customers by using this method as your listings will be shown in 70+ countries. Amazon handles the shipping and all calculations for shipping, duty, tax and export fees.
This method is easily scalable as Amazon leverages its global reach to make changes to the quantity of your shipment easily.
Cons
Shipping times to customers can be longer when using FBA Export and some items are not eligible for FBA export. Oversized products or entertainment banned in certain countries may not be eligible.
Amazon also adds several fees like a unit fee, handling, pick and pack, and weight fees. This can make FBA Export less economical than other options.
Amazon Global Selling (Pros and Cons)
With this option you can choose which countries you’d like to sell in, then ship your products to an Amazon fulfillment center in those countries.
Once the products are ordered they are shipped to customers directly from those warehouses. This option is available in over 180 countries, making it a great option if you want your products to reach your customers faster.
Pros
Faster shipping to customers is one of the pros but others include more control over your shipping and communications and more customer service options.
Cons
Shipping product directly overseas may mean longer lead times. You’ll have less time and flexibility in responding to changes from forecasted to actual demand.
There is also a slower setup and activation process since you have to register to sell in each market individually. This overall process takes more time but is more economical.
Selling on Amazon can be an incredibly lucrative enterprise and is not complicated once you get the hang of it.
From choosing the right product to embracing seller best practices to choosing the right fulfillment company, every decision is a critical part of building your online business.
Follow these steps and best practices and you will be making your first sale on Amazon in no time!
